
Sensory play includes any type of activity that stimulates a child’s senses and develops milestone skills.
Some of these milestone skills that develop during sensory play time are:
- Fine motor skills
- Gross motor skills
- Hand-eye coordination
- Spatial awareness
- Exploring and discovering new items
- Hands-on practical learning
- Dispensing
- Social interactions
- Independent play
- Language development
- Mathematical concepts
- Problem solving
- Boost creativity
- Imaginary play
Creating a sensory play activity for your little one shouldn’t feel like a lot of work or effort and is typically set-up in only a few minutes. It should be as simple as finding your tray, adding a base filler, some key components and sensory play tools. To make it a bit more interesting you can keep to a specific theme. Sensory fillers can be stored in airtight containers for a very long time.
*Please note that most of these sensory base fillers present a choking hazard for young children. Adult supervision is required during sensory play time. *
To make it easier for busy mamas I’ve listed our TOP 10 fun sensory base filler ideas for some fun sensory trays!
*Disclosure: I only recommend products I would use myself and all opinions expressed here are my own. This post may contain affiliate links that at no additional cost to you, I may earn a small commission.
1. Play Sand
Play sand can easily be found at hardware stores or even gathered at the beach. Great alternative fillers for sand can be blended cereal!
Creating a beach small world play during summer time is an absolute must for kids. It will give them a glimpse of how the ocean look or can even get them excited for a vacation trip to the coast.
Creating detailed small world trays are not only fun for the kids to explore but it’s also so comforting and relaxing. I enjoy creating trays for the kids!
Also how cute are all the little miniature sensory play essentials in this tray!
Materials used:
- Wooden tray
- Play sand: It can either be store bought or blended cereal
- Little shells
- Starfish
- Green moss
- Miniature buckets
- Dollhouse beach chairs and umbrellas


2. Dyed Colored Salt
The kids love salt play because it’s soft, taste-safe, cheap, and super easy to dye.
Creating a colored salt tray is not only beneficial for sensory play but can also be used in activities like:
- Creating art layered salt jars
- Use as a pre-writing tray
- To create small world plays
- In water play activities and art paintings.
Materials used:
- Salt
- Liquid Food coloring
- Resealable bags / container
- Essential oils
- Wooden tray
- Sensory play tools
How to dye salt:
- Add one cup of salt to a resealable bag or a small container
- Add a few drops of liquid food coloring to the salt. Note that the more food coloring you use the brighter the color will be.
- Seal the bag / container and give it a good shake
- Mix the bag / container until the salt is covered in the desired color.
- Spread it out on a baking tray or plate. It takes a while to dry completely.
- Repeat the process with additional colors.
- You can make the salt scented by adding a few drops of essential oils.


3. Ombre Beans


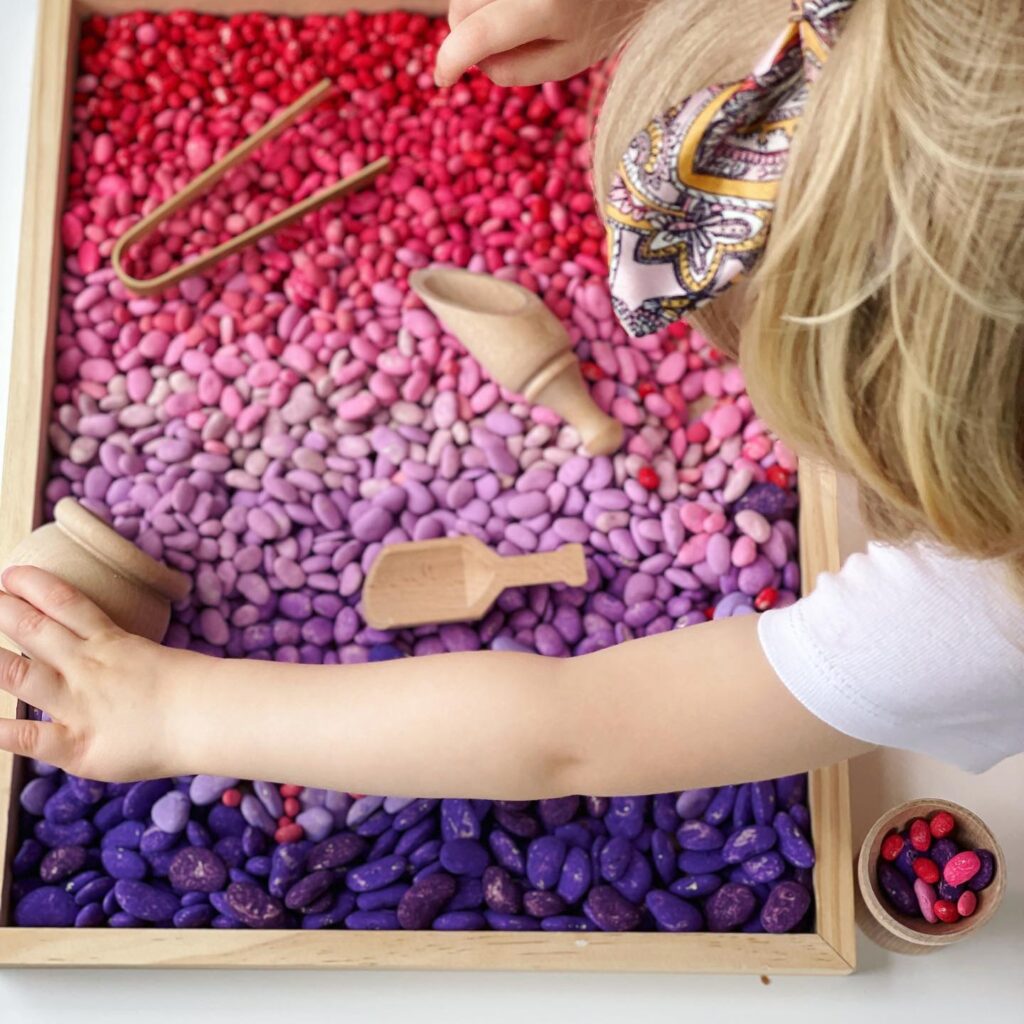

Dried beans are one of our favorite sensory play fillers and to color the beans for sensory play is relatively easy and doesn’t require a lot of effort and time.
To break away from the normal rainbow-colored trays I decided to focus more on toned colors and gave this play an “Ombre” – the French word for ‘shaded color’ or ‘graduated in tone’ look and feel!
Materials used:
- Different sized beans:
- Paint (liquid food coloring can be used as an alternative)
- I made use of Acrylic paint because it’s easier get the specific color tone you want if you want to create an Ombre look.
- Wooden tray
- Wooden sensory Montessori tools
- Resealable bag or container for mixing
How to dye the beans:
- Place a portion of the beans in a resealable bag/container.
- Squirt a few drops of paint on the beans.
- Seal the resealable bag/container and give it a good shake.
- Mix until all the beans are covered in the desired color. If you are not satisfied with the coating add more paint.
- Spread open on a baking tray and use when dry.
- Repeat the above process until all colors are done.
4. Scented Unicorns & Rainbows Orzo


You might think that it’s rice but it’s not. Orzo pasta is longer than rice and feels heavier.
I created a cotton candy scented unicorn sensory tray for the kids, and it smelled amazing. Don’t think that you can only get scented play dough, using essential oils in dry sensory fillers are doable too.
Materials:
- Orzo pasta
- Paint
- Essential oils
- Resealable bag / small container
- Baking tray / plate
How to dye Orzo pasta:
- Add 1 cup per color of orzo in a resealable bag/container.
- Squirt a few drops of paint and essential oils in the bag.
- Seal the resealable bag/container and give it a good shake.
- Mix until all the orzo pasta are covered in the desired color. If you are not satisfied with the coating add more paint.
- Spread open on a baking tray and use when dry.
- Repeat the above process until all colors are done.
5. Neon Garbanzo Beans
You may also refer to garbanzo beans as chickpeas! I must admit that these beans dye the best because the outcome of dying these beans are always so pretty and they dry almost instantly.
Materials used:
- Bag of dry garbanzo beans
- Neon paint
- Resealable bag/container
- Baking tray/plate
How to dye garbanzo beans:
- Place a cup per color beans in a resealable bag/container.
- Squirt a few drops of Neon paint on the beans.
- Seal the resealable bag/container and give it a good shake.
- Mix it until all the beans are covered in the desired color. If you are not satisfied with the coating add more paint.
- Spread open on a baking tray and use when dry.
- Repeat the above process until all colors are done.

6. Butterfly Pasta


Pastas are probably the most versatile material for sensory play because there are so many different shapes and sizes of pastas available at a very low cost.
You also don’t have to dye or color some of the pastas, it can be used in all it’s beautiful natural glory!
I dyed the following pasta types with paint for this sensory tray:
How to dye pasta:
- Get a small container or resealable plastic bag. One plastic bag/container per color.
- Add a cup of dry pasta to the container/plastic bag.
- Add a few drops of paint and one squeeze of hand sanitizer. We made use of Acrylic paint. Acrylic paint is non-toxic but you can also make use of food coloring to dye pastas.
- Seal the plastic bag/container and mix and shake until all the pasta are thoroughly coated in paint. If you see that there are still spots that need to be colored add more paint and repeat to shaking and mixing.
- Once you are satisfied with the batch, spread the pasta open on a baking sheet or plate and let it dry.
- Repeat the process with all the different colors you want to create.
- Once the pastas are dry it’s time to setup the sensory tray.
Why add hand sanitizer?
- It helps to set the color so that it doesn’t come of easily.
- If using scented hand sanitizer your sensory filler will smell amazing.
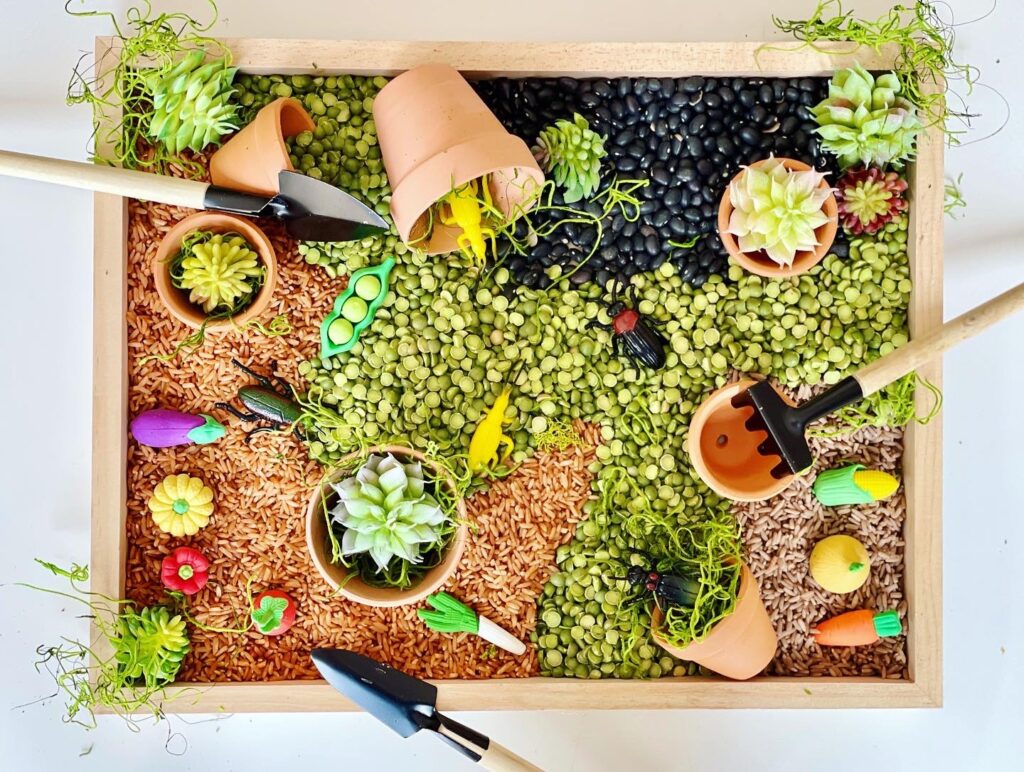
7. Lentil Garden
Making use from items that’s commonly found in your pantry is sometimes a life saver when you need it. I had some leftover black beans, lentils, and green split beans that I knew I’m not going to use again so creating a garden tray seemed like the best thing to do other than throwing it away.
Materials used:
- Wooden tray
- 3-piece gardening tool set
- Mini terra cotta pots
- Succulents
- Sensory base fillers: Black beans, green split beans and brown dyed rice
- Bugs figurines
- Mini Vegetables
8. Classic Rainbow Rice Tray
This is probably the first tray you want to start with when introducing your little one to the wonderful world of sensory play!
Our sensory filler consists of dry rice that’s dyed with pastel acrylic paint. If your little one tends to taste sensory fillers, it’s best to make use of liquid food coloring to dye the rice.
Materials:
- A bag of dry Rice
- Acrylic paint or liquid food coloring
- Resealable bag/small container
- Baking tray
How to dye rice:
- Add a cup of rice in a resealable bag/container.
- Squirt a few drops of paint or liquid food coloring to the bag/container.
- Seal the resealable bag/container and give it a good shake.
- Mix until the rice is covered in the desired color. If you are not satisfied with the coating add more paint or food coloring.
- Spread open on a baking tray to dry.
- Repeat the above process until all colors are done.
- Once the colored rice is dry it’s time to setup a sensory tray.


9. Bird Seed


This is just another idea to show how sensory fillers can easily match a specific theme you are going for. This tray was all about birds and what better filler to use than bird seed.
We used the filler to make bird feeders afterwards, so nothing goes to waste!
This sensory tray consists of:
- Bird seed mixture as a sensory base filler
- Birds
- Bird nests
- Wooden sensory tool kit
- Mini Robin chocolate eggs
10. Cereal Construction
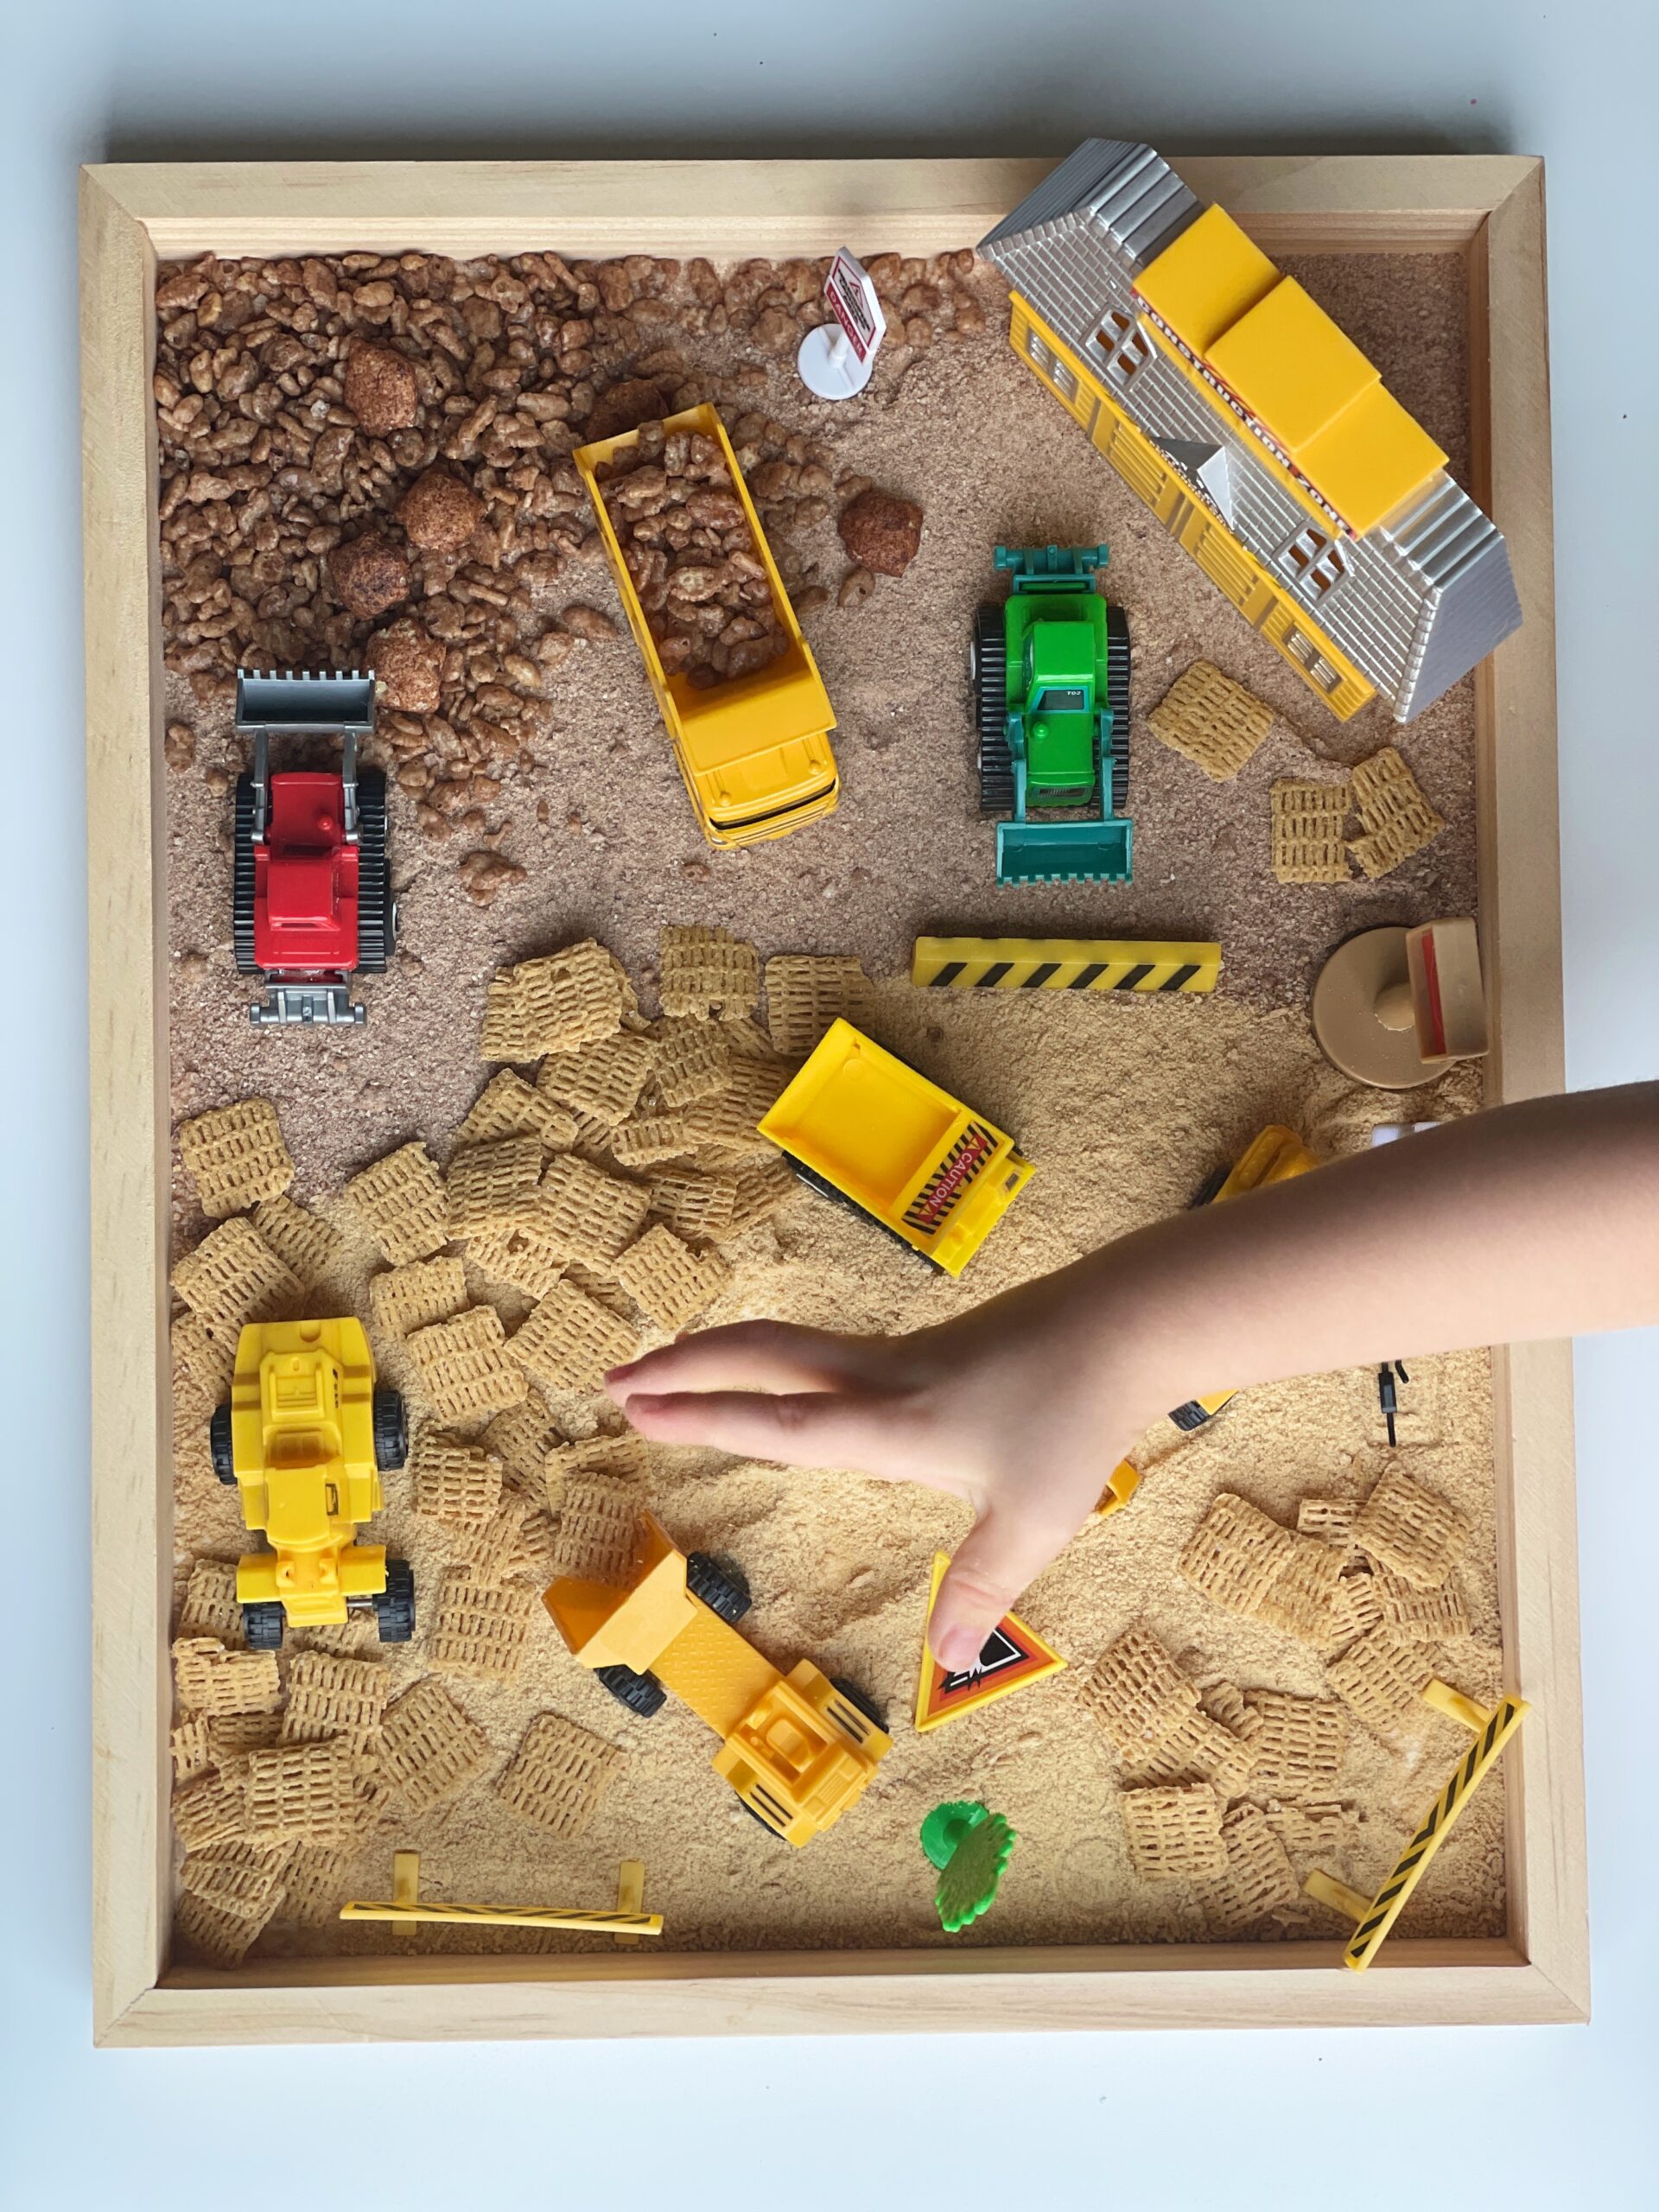


Another taste-safe option is to make use of cereal!
A sensory tray like this will work perfectly as a morning play that will give a busy mama some time to enjoy a warm cup of coffee while the kids are playing and, well of course eating.
Materials:
- Different cereals
- A blender
- Wooden tray
- Construction vehicles and themed accessories
